AtomJump Messaging Appliance

Download VirtualBox for your platform (Windows / Linux / Mac), and the Messaging Appliance. On a Mac / Linux, we recommend that you download the Gzipped version of the Appliance, because the unzipped file is larger than some unzip software can handle.

Unzip the Appliance file, which should create a .vmdk file. For cloud users, you can import this .vmdk file into your cloud system, rather than import it into VirtualBox.

Run VirtualBox on your platform, and add a 'New' project.
Enter:
Type = Linux
Version = Ubuntu (64-bit)

Note:
on Windows, if you can only see ‘Ubuntu (32-bit)’ and you are definitely on a 64-bit machine, you will need to configure your server’s BIOS setting for virtualization to be switched on. See details here.

Click 'Continue' and then ‘Use an existing virtual hard disk drive’. Select the .vmdk file from your drive. On the next screen you will be given a 'Memory Size' option. We would recommend at least 1.5GB, and preferably 2GB.

Run the VM and when you see a login after 20 seconds or so, enter the
Username: localadmin
Password: lander5321

Once logged in, you should first change your password. Enter the line:
passwd
and enter your old and new passwords.

Then enter the line:
hostname -I
It should show you the VM server's IP address e.g. 10.0.2.15

Then enter 'Settings' for this Virtual Machine.
Go into 'Network' and click 'Port Forwarding'.
And add a new line similar to the above, using the Guest IP as the IP address found from the 'hostname -I' command.

Typical settings are:
Protocol: TCP
Host IP: 127.0.0.1
Host Port: 5100
Guest IP: 10.0.2.15 (or the IP address found after running 'hostname -I' within the server)
Guest Port: 80
The LiveWiki should now be accessible within a browser on http://127.0.0.1:5100
Technical Domain Note: You should decide on a domain/IP address that users of the system will enter to access your LiveWiki e.g. http://my.intranet.domain. Setting this up is beyond the scope of this guide, but there are several approaches. One option is to set a LAN domain on your router using DD-WRT (detailed 
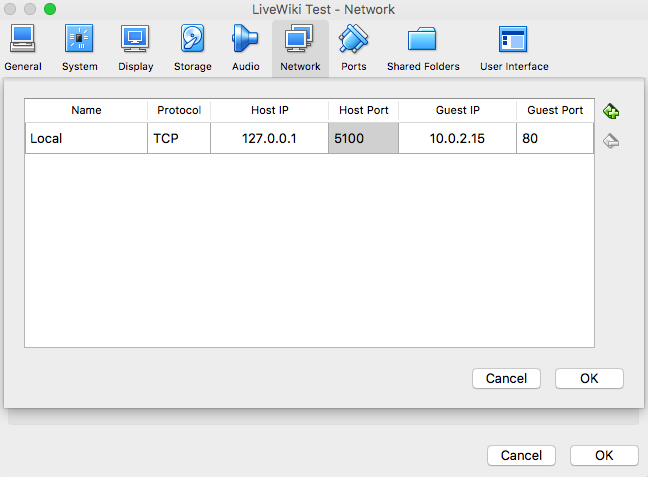
here), or you can edit your 'hosts' file on each machine to point your chosen local domain at the server, or simply use a LAN-based IP address e.g 192.168.0.10. It is often a good idea to manually assign the IP of your server to your machine address (known as the 'mac address') within the router. For non-live situations, or if it is accessible on your own machine only, you can still use the default 127.0.0.1, but you won't be able to change this address later, quite so easily. You can also use a public-level domain e.g. mywiki.mycompany.com if your machine is serving over the internet.

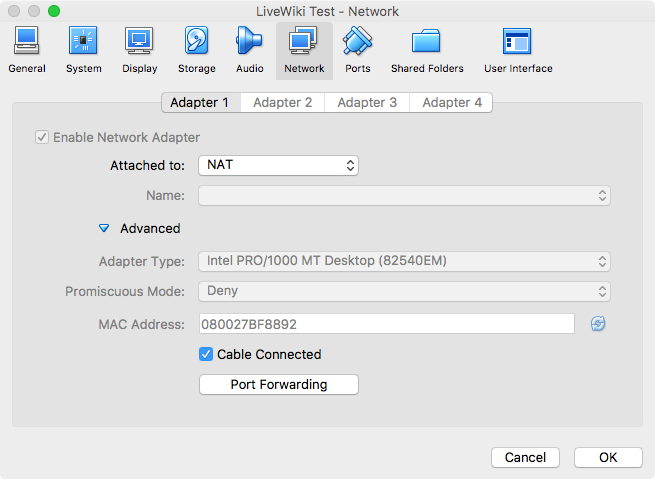
Technical Port Note: rather than running this on port 5100, you can run this on the standard http and https ports (80 or 443) via port forwarding, which will save you having to enter the port number. We will use the port 5100 in the examples below, however, as this should work in the simple situation. If you decide to use secure transport, i.e. over https, you will also need to configure your secure key files manually on your server.

Technical Firewall Note: To be visible across the LAN you will likely need to open your machine's firewall for the port number used by your LiveWiki (e.g. 5100).


Once you have chosen this domain and set this up, run the LiveWiki from your chosen domain in a browser. Now click the ‘Update the server config’ link from the home page, which configures the messaging to run from the current domain, click 'Go Back', and try the large messaging button. Follow the instructions to set up the admin user. Then click through to the LiveWiki.

The main appliance target page is http://your.domain.or.ip:port/livewiki/

Important Note: the chosen admin user will have rights to enter passwords on a particular forum, limit subscribers to a particular group of people (based on their email domain), and rename forums.
If you are using the AtomJump Messaging app, and you want notifications on your phone:

Your phone should be connected to the same company Wifi or VPN network as the server. The address to use under the 'Private Server' link, or the 'Pair with a Private Server' address on the app homepage, is:

http://[your server IP or host]:5100/vendor/atomjump/loop-server/

E.g.
http://192.168.1.10:5100/vendor/atomjump/loop-server/
or
http://myhostname:5100/vendor/atomjump/loop-server/

Note: This is the same address to use if you want other server software to connect to your local AtomJump Server. If this connecting software is residing on the same machine, you can use the local server IP, also i.e.

http://127.0.0.1:5100/vendor/atomjump/loop-server/

Next Step: You should now carry out a software update, to resolve known security issues (see the section below).

Technical Specifications

Item Specification
Operating System Ubuntu Linux 64-bit, but runs on a host Windows Desktop, Windows Server, Mac OS X, Linux.
Software Language PHP 7.4
Database MySQL 8.0
Host Disk Space Required 10GB, dynamically up to 250GB
RAM Required 1GB minumum
Simultaneous Users 1 up to an approx maximum of 100, depending on usage patterns
Application Software AtomJump Messaging Server 3.9.2
Default Plugins Large Stickers, App Notifications, Basic Emoticons, Language Switcher (15 languages: English, French, Japanese, German, Italian, Chinese Simplified, Chinese Traditional, Hindi, Punjabi, Bengali, Korean, Spanish, Portuguese, Russian, Indonesian), Immediate Auto-Responder
Default Interface LiveWiki
Access Super-user file-level access, Full database access, no AtomJump support access unless you request it.
Support US$ 64 (NZ$100) for Remove-screen-based remote access, plus prices for individual tasks (see the LiveWiki add-ons)
Price Free
Number of messages Approx 10 million per 10GB of dynamic space
Number of shared images Approx 50,000 per 10GB of dynamic space
Software Updates A manually triggered update script, Ubuntu OS updates.
Security The software should be run within an internal intranet, for any secure applications. A secure https server can also be used, although it needs an individual key installation.
Client Software
Mobile browsers (e.g. iPhone or Android), Desktop browsers (incl. Chrome / Firefox / Safari / Edge /IE). The AtomJump Messaging progressive web app for mobile/desktop notifications.

Software Updates and Configuration

After your first installation we recommend updating your core Messaging Server software immediately after the installation, and then at regular intervals (e.g. monthly) after that. This is particularly important if this instance is visible over the internet, as opposed to a local intranet installation. It will also fix some known issues (as listed below).

Log in and enter the command:
updateapp
It will give you options to update the:
1. Base Operating System
2. Language files
3. Notification software for popup messages on phones/desktops  (can be installed, and also see the port forwarding section in 'Notifications', below)
4. Notification settings
5. Email configurations   (have an 'SMTP' server ready to use prior to configuring this e.g. an account with smtp2go.com)
Note: For an operating system update, by itself, which can also be done at regular intervals (e.g. monthly), log in and enter the commands:
sudo apt-get update; sudo apt-get upgrade

Notifications

To enable email sending you should see the 'Software Updates and Configuration' section, above. Note: by default, your Appliance will not be able to send emails (and without email configured, it will give some messages to say that you should confirm your email address once you sign up; although presently you do not have to confirm your email address to keep your account).

In order to get popup-notifications to your Android or iPhones (or your desktop) from your Messaging Appliance, install the Notification software in the 'Software Updates and Configuration', above. Once this is done, you need to open another Port Forwards in VirtualBox > Network Settings > Advanced > Port Forwarding. Port 5566:
Protocol: TCP
Host IP: 127.0.0.1
Host Port: 5566
Guest IP: 10.0.2.15 (or the IP address found after running 'hostname -I' within the server)
Guest Port: 5566

Advanced Configuration

Log in, and enter the command:
server
sudo nano /config/config.json
You can scroll down with the arrow keys. Under the "email" section, you can enter a configuration for sending off email notifications. Please see the User Guide for more details.

Once you have changed the file, you can hit 'Ctrl - O' together, then push 'Return'. It should say 'Wrote xx lines'. Push 'Ctrl - X' when done.

Warning: changes to the configuration files can make your system in-operable. We recommend backing up the file beforehand with e.g.
server
sudo cp /config/config.json /config/config-backup.json

Live Recording

By default, the live recording feature is switched off for video and audio.  To switch on this live video/audio feature, you must be running either an "https://" secure site address or only accessing the site from a single machine i.e. localhost.  Run the 'updateapp' script, above and answer 'yes' to the questions about 'Live Recording'.

Accessing your Messaging Appliance remotely

If the appliance is being used in a home or company setting, there will be many times when you need to access your appliance away from the premises that holds the server.

To do so securely, we would suggest setting up a VPN. See this guide.

Importing Into Cloud Systems

These instructions may change over time, depending on the particular cloud provider. The AtomJump Messaging appliance is a .vdmk file (once it is unzipped).


Note: AtomJump has no affiliation with any of these providers.

You are welcome to let us know if you manage to successfully import an AtomJump Messaging .vdmk, or not, with your provider.

Known Issues

1. On an Android phone, if you are using a non-secure http address for your server, and your phone browser's setting's 'Lite Mode' is switched on, you will likely find images seem to flicker every 5 seconds or so.

We would recommend switching 'Lite Mode' off to stop the flickering in your Chrome Browser's Settings page.
Alternatively, once you associate an https domain with the server, the problem should disappear.

2. You cannot use ampersands '&' in the title of a forum. Please use an alternative.

3. Versions prior to 0.7.7: Vertically oriented images might be blurry. Please see 'Software Updates' above, and run an update on the Messaging Server software to resolve this issue.

4. Versions 0.8.0 and prior, have a security issue for notifications set up via the app, so we strongly recommend carrying out a software update immediately. Please see 'Software Updates' above to resolve this issue.

5. For versions prior to 0.7.7 see Software Updates above, and then click the following link to run a one-time update of your database:
http://127.0.0.1:5100/vendor/atomjump/loop-server/update-indexes.php
[or using your own IP address at http://myipaddress:5100/vendor/atomjump/loop-server/update-indexes.php]

6. Versions <= 0.8.0 use the username 'aj_customer' and need to use the update script: eval "$(curl -fsSL https://git.atomjump.com/live-wiki-updates.git/update)" rather than 'updateapp' which later versions use. You also will not be able to enter 'server', and instead need to enter 'cd /jet/www/default/vendor/atomjump/loop-server/'.

Troubleshooting

Please open the Appliance Troubleshooting community forum.

Prior Versions